How to prepare your deals for a Salesforce forecast call
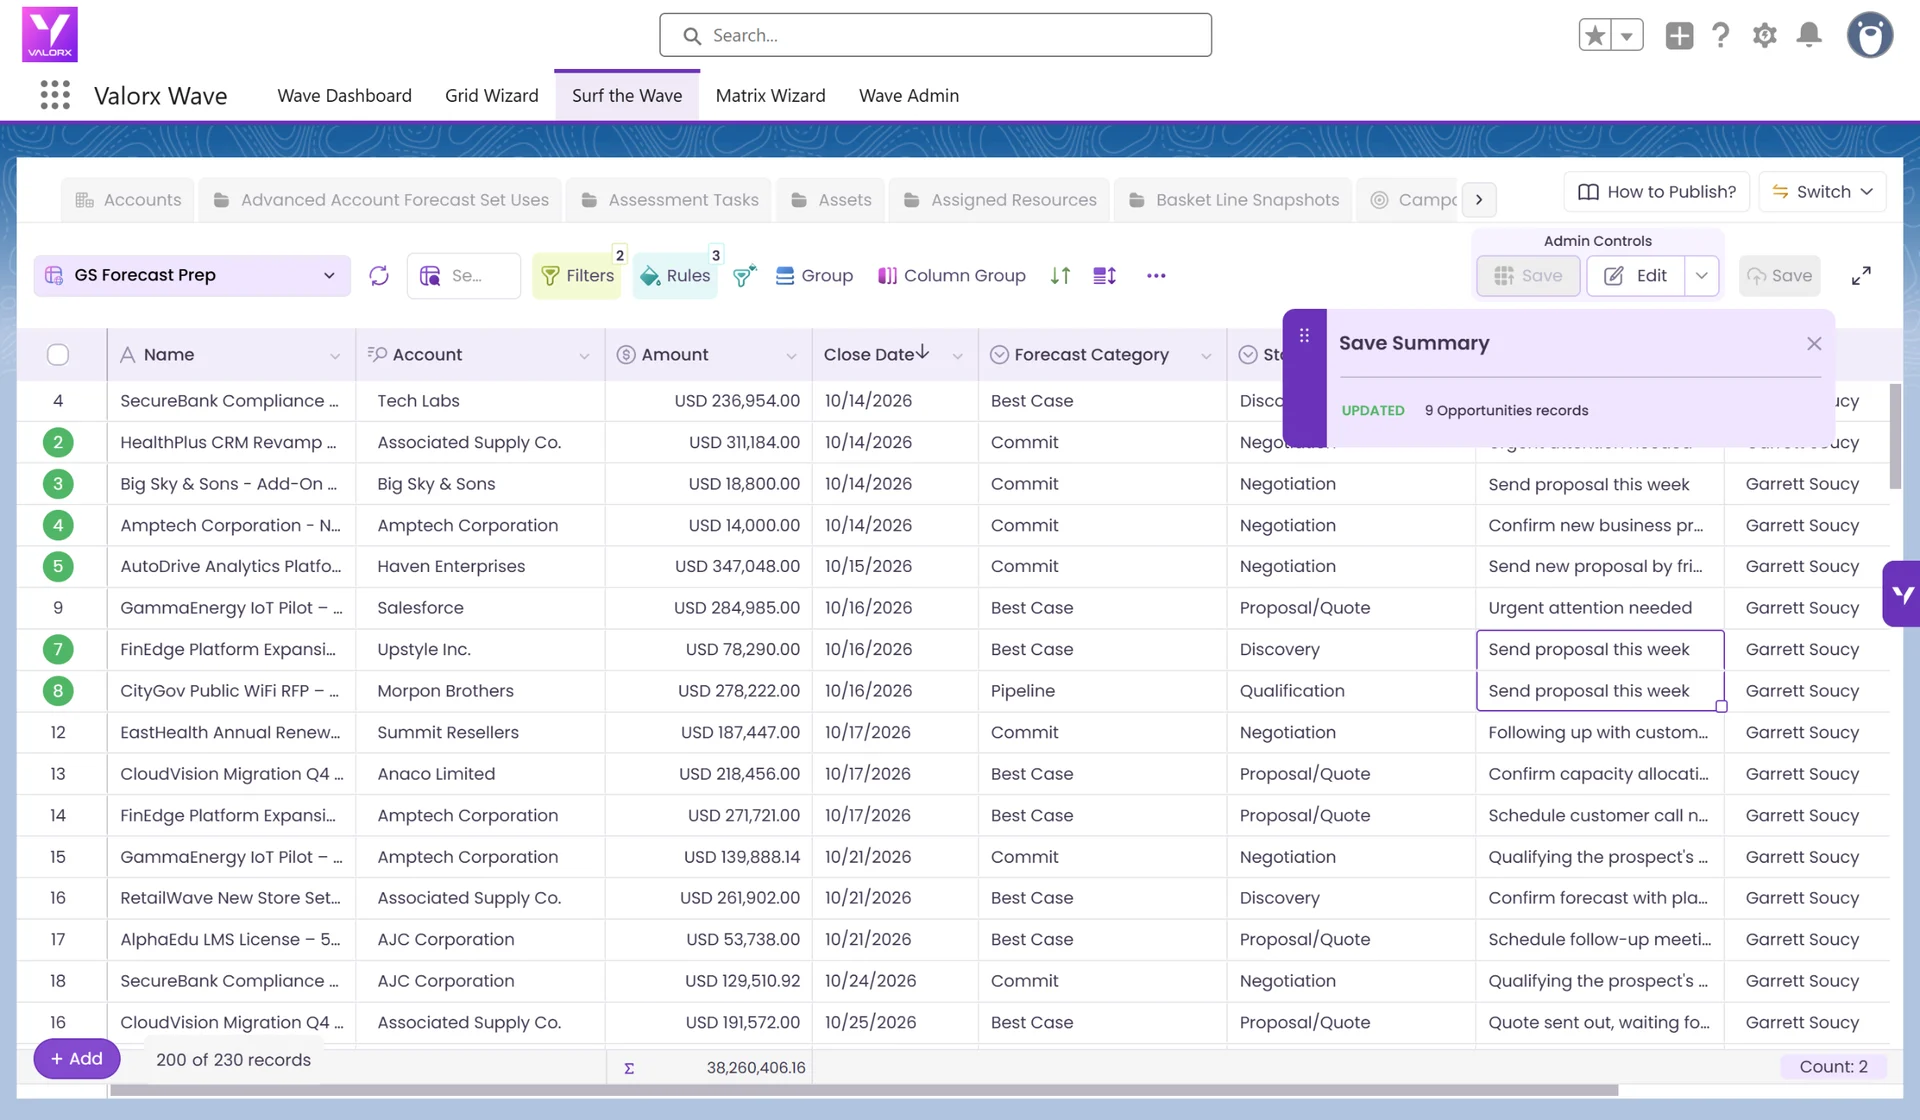
Salesforce forecast prep means getting the Stage, Amount, Close Date, Forecast Category and Next Step current on every open deal before your forecast call. In Valorx Wave, you build one Opportunity grid filtered to your open deals, flag what needs attention, update everything inline or in bulk, and save back to Salesforce. Total time: under 10 minutes.
In this guide: the 8 Opportunity fields that matter for forecasting, 3 filters that scope the grid to your deals, 3 rules that flag problems, and a 6-step build you can reuse every forecast cycle.
Here’s what you’re building
Before the steps, here’s the end result. Click through the interactive walkthrough below.
What you'll have
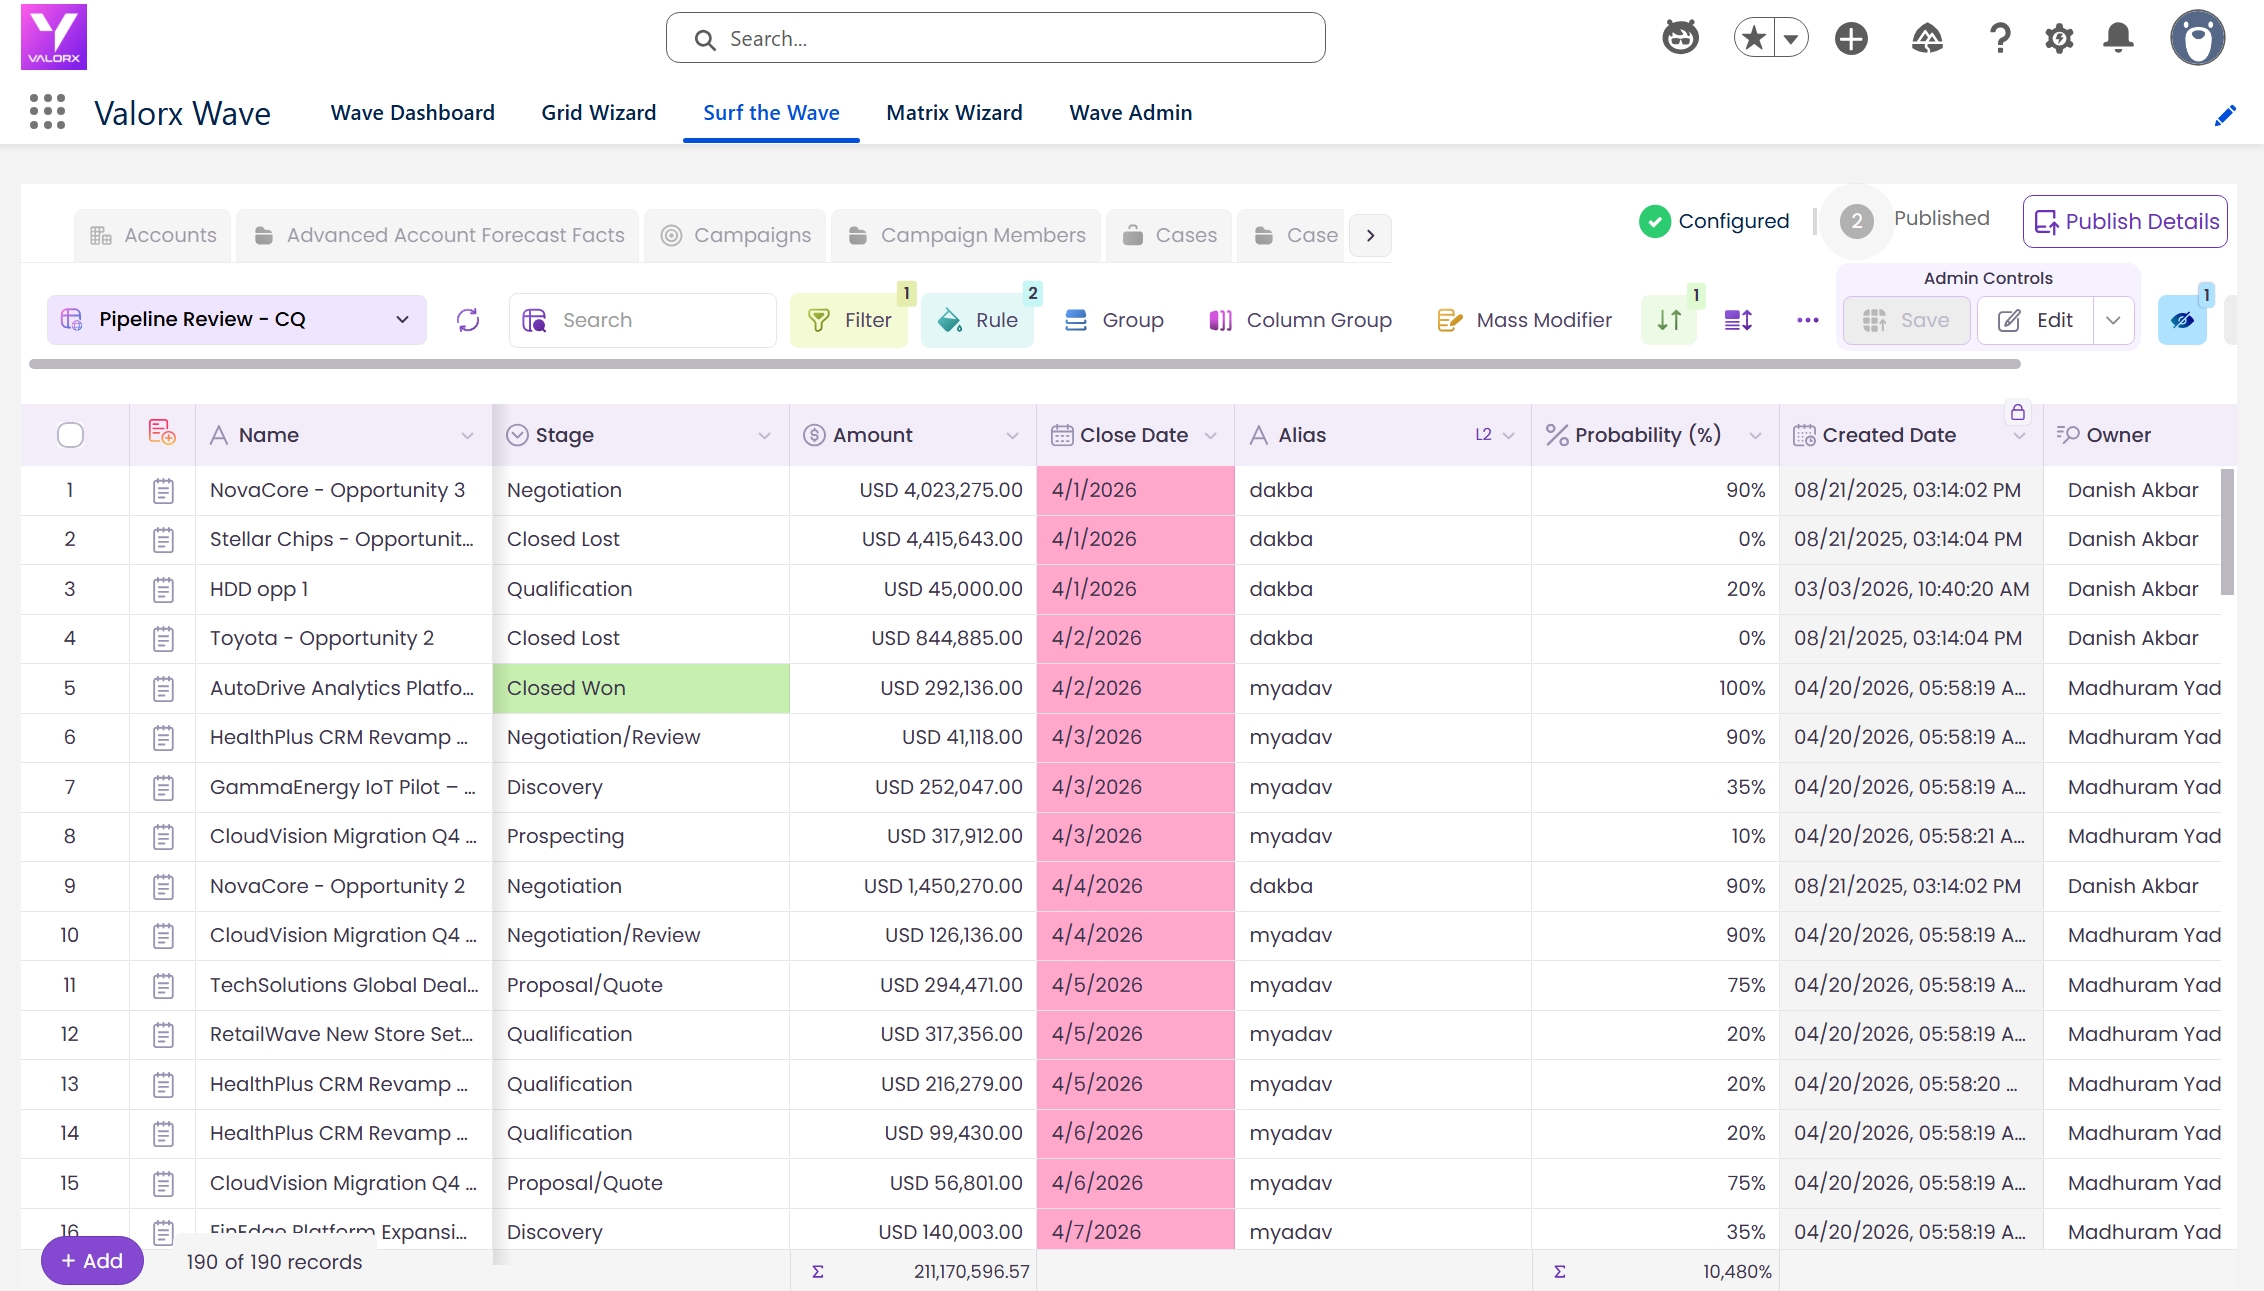
A single Opportunity grid filtered to your open deals, showing Stage, Amount, Close Date, Forecast Category and Next Step. Everything is editable, so you update deals inline or in bulk and save back to Salesforce before your forecast call.
What this replaces
Clicking into each Opportunity record one at a time, switching between list views and reports, and spending 30+ minutes getting forecast categories straight before the call.
Real-life example
It’s Tuesday morning and your forecast call is at 2pm. You have 18 open opportunities. You need to update Close Dates, move three late-stage deals from Pipeline to Commit, and adjust the Amount on a deal where pricing just changed. Instead of clicking into 18 records, you open your Wave grid, sort by Close Date, make every change in one view and click Save. Done in 8 minutes.
Ready for your next forecast call? Follow the 6 steps below.
Time: ~10 minutes to build, then reusable every forecast cycle | Role: Designer or Admin in Wave | Object: Opportunity
Prerequisites
- Valorx Wave installed
- A Designer or Admin role in Wave to build the grid. Reps with a Standard role can use it once it’s shared.
- Opportunities in Salesforce with Stage, Amount, Close Date and Forecast Category in use
Fields you’ll add
| Column | Salesforce field | Why it matters | Update before the call? |
|---|---|---|---|
| Opportunity Name | Name | Identify each deal at a glance | No |
| Account Name | Account.Name | See which accounts drive your pipeline | No |
| Stage | StageName | Move deals as they progress, for example Negotiation to Closed Won | Yes |
| Amount | Amount | Adjust deal value as pricing firms up | Yes |
| Close Date | CloseDate | Push or pull dates to reflect reality | Yes |
| Forecast Category | ForecastCategoryName | Move deals between Pipeline, Best Case and Commit | Yes |
| Probability (%) | Probability | Weighted likelihood, set automatically by Stage | Auto |
| Next Step | NextStep | Record what has to happen to close the deal | Yes |
Build your forecast prep grid
Build it once and reuse it before every forecast call.
Step 1: Create a new grid on the Opportunity object
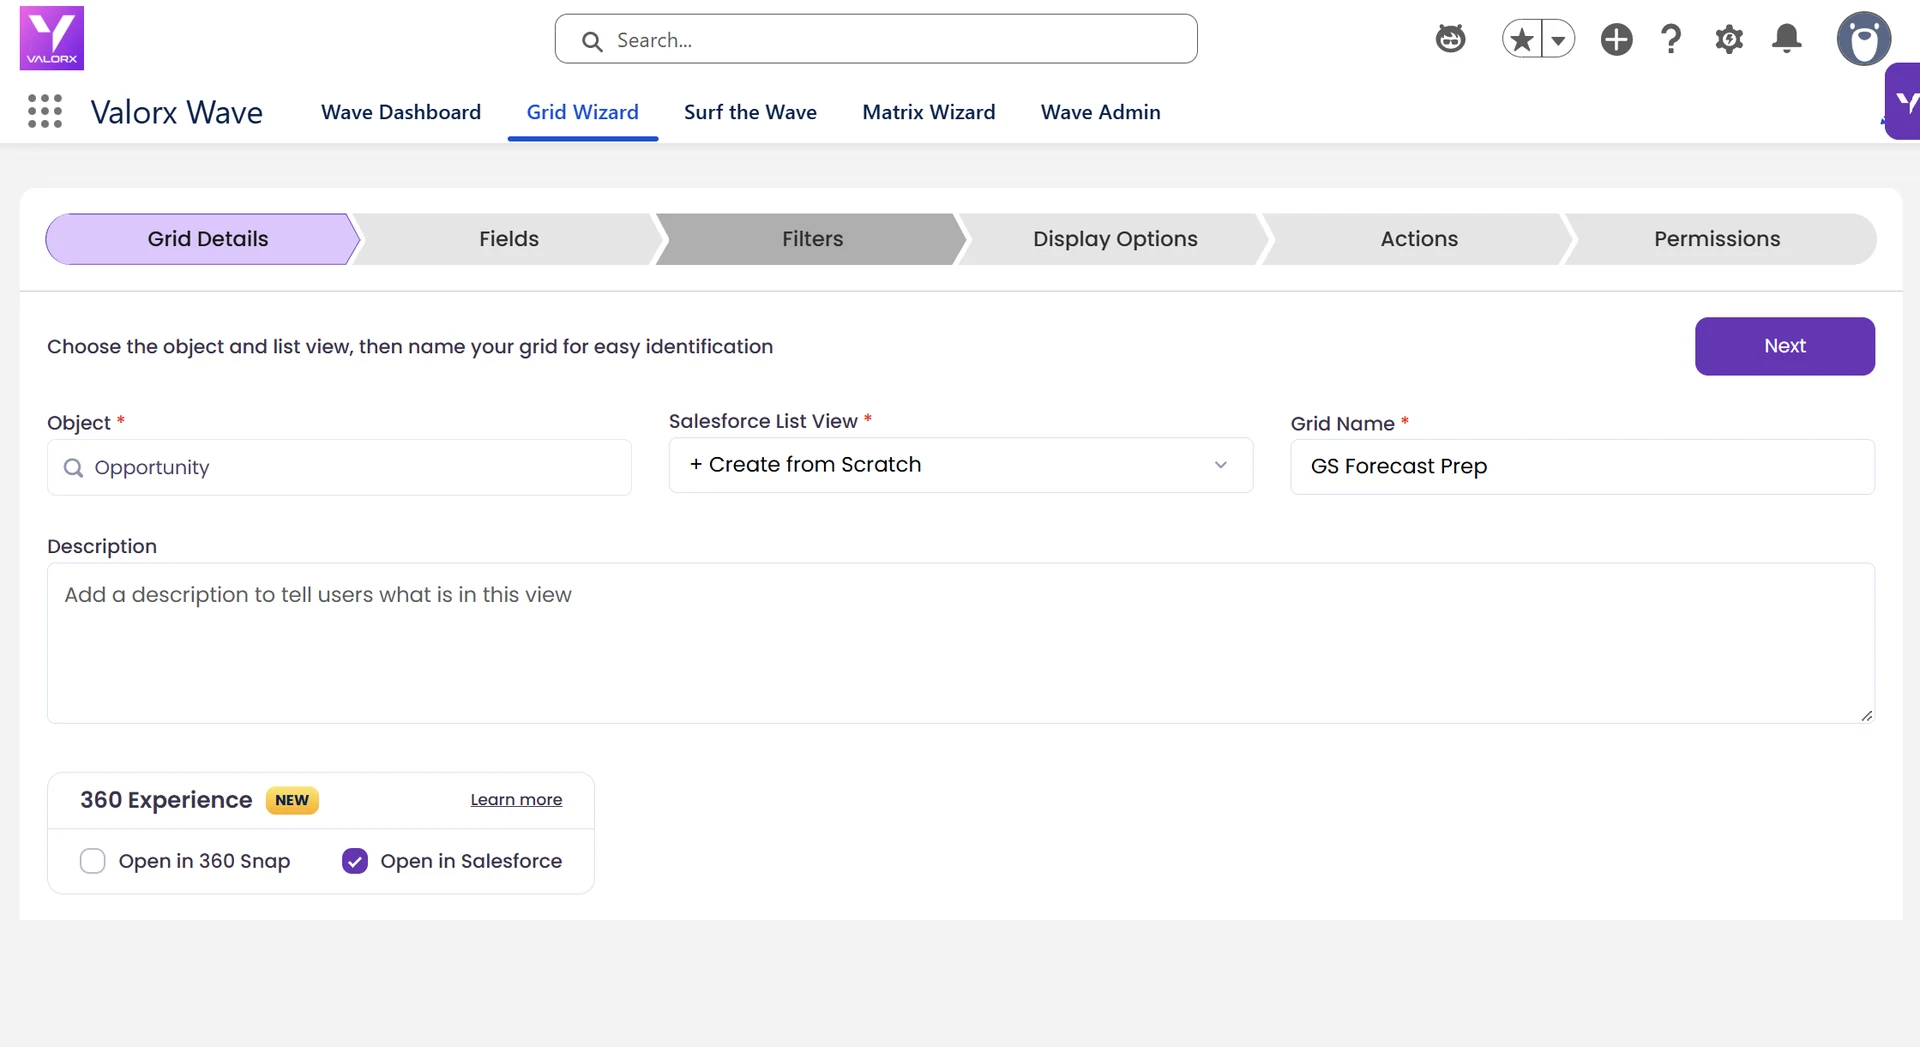
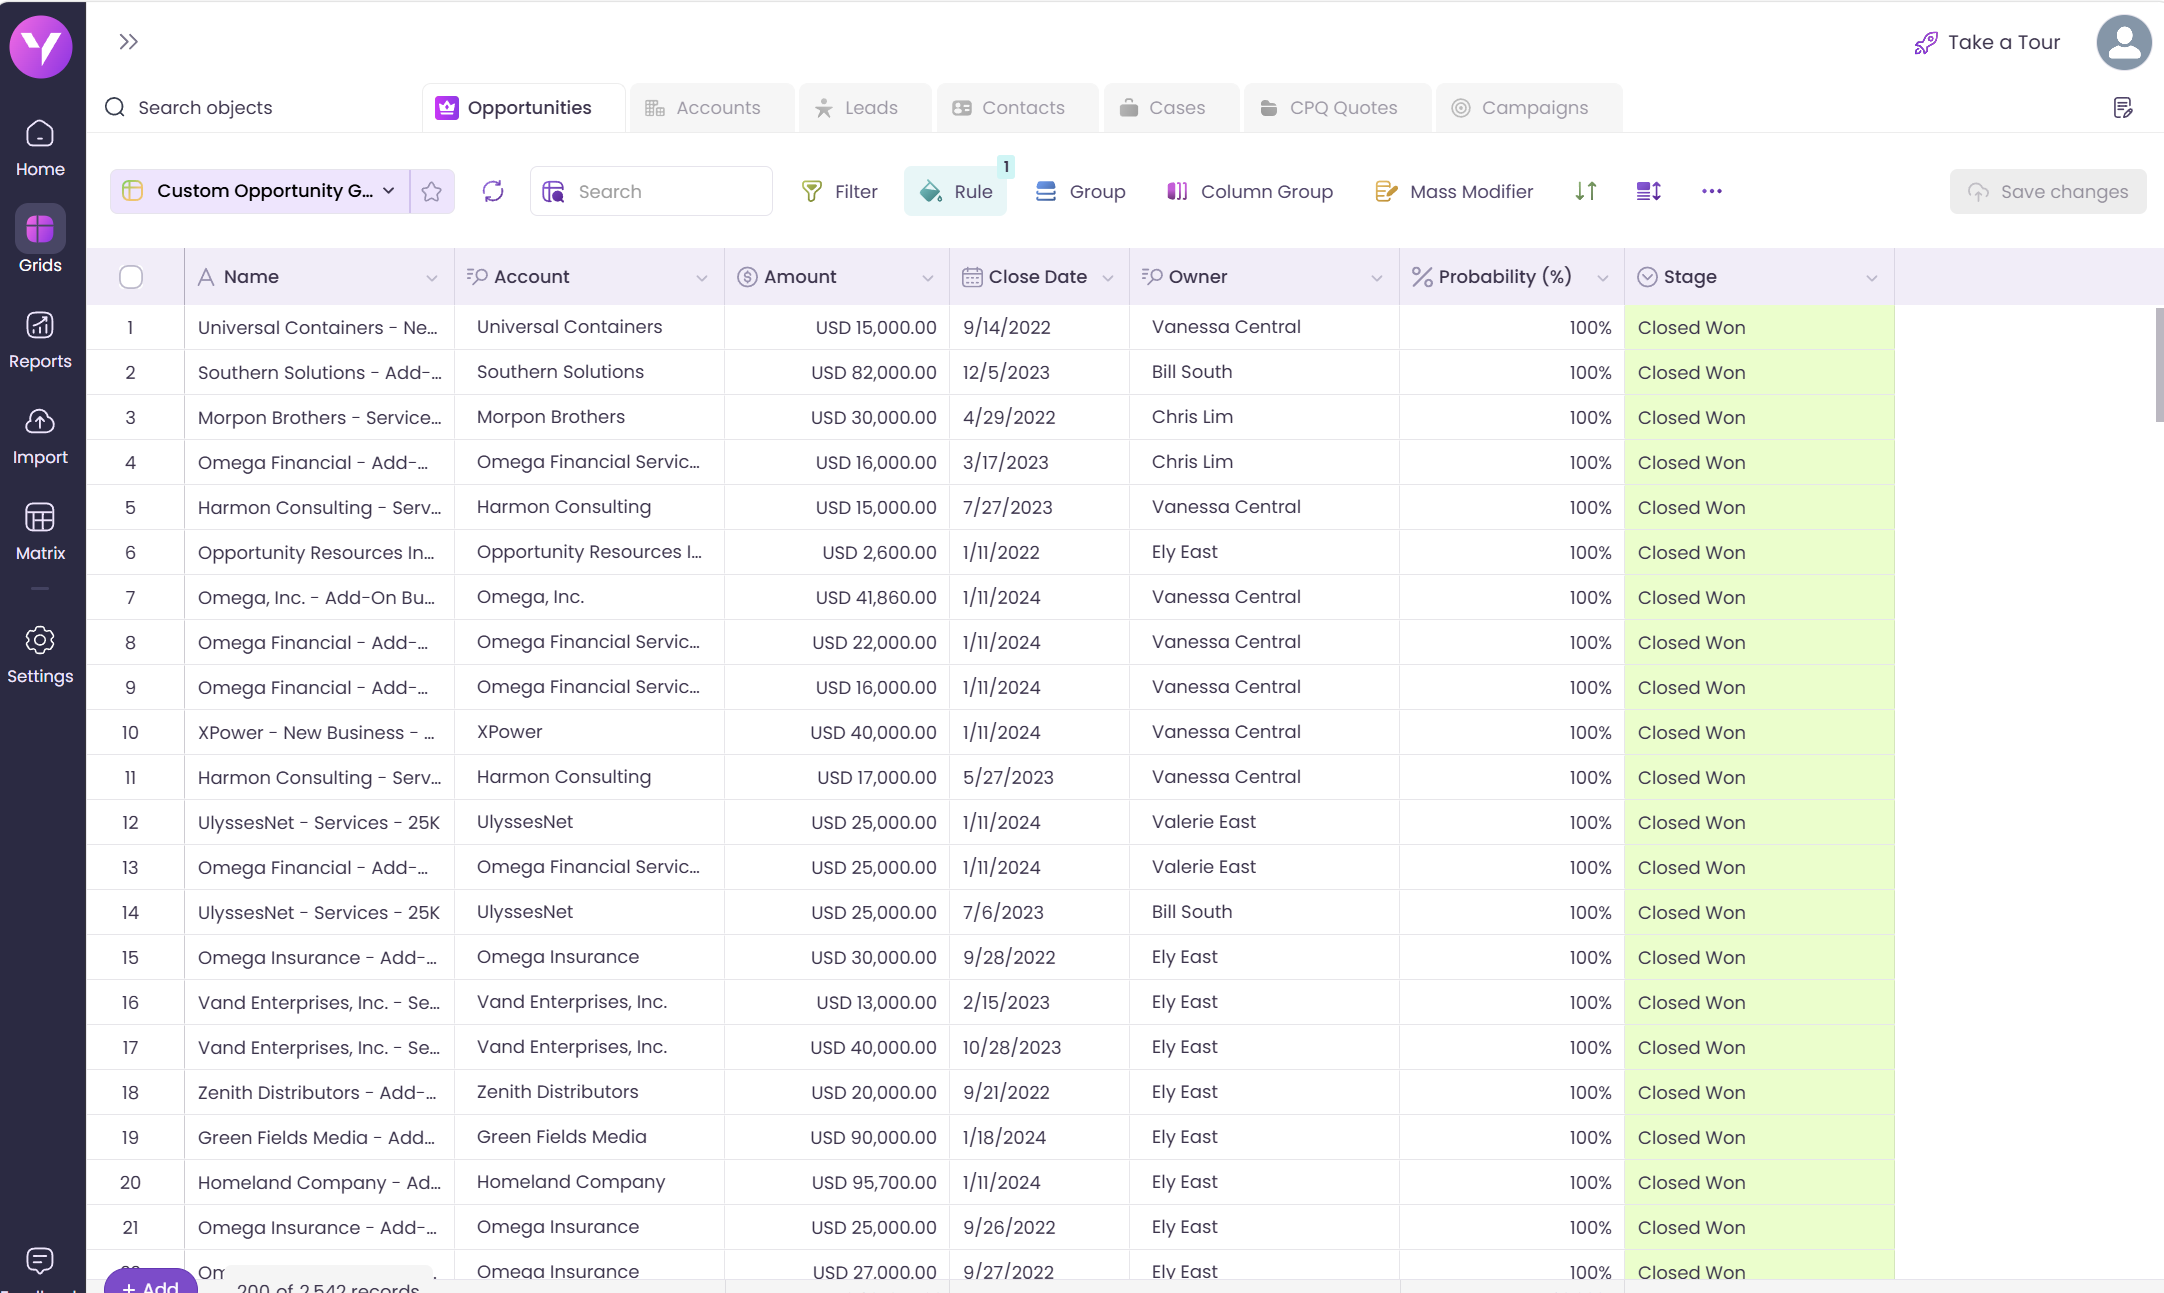
Open Valorx Wave and go to Grid Wizard. Under Grid Details, select Opportunity as the object and choose Create from Scratch as the list view. Name the grid something you’ll recognize every cycle, like “Forecast Prep” or “[Your Name] Pipeline Review”. Click Next.
Step 2: Add your forecast columns
Add the eight fields from the table above: Name, Account, Stage, Amount, Close Date, Forecast Category, Probability and Next Step. Click Next.
Keep the grid focused on what you review in forecast prep. You can always add more columns later.
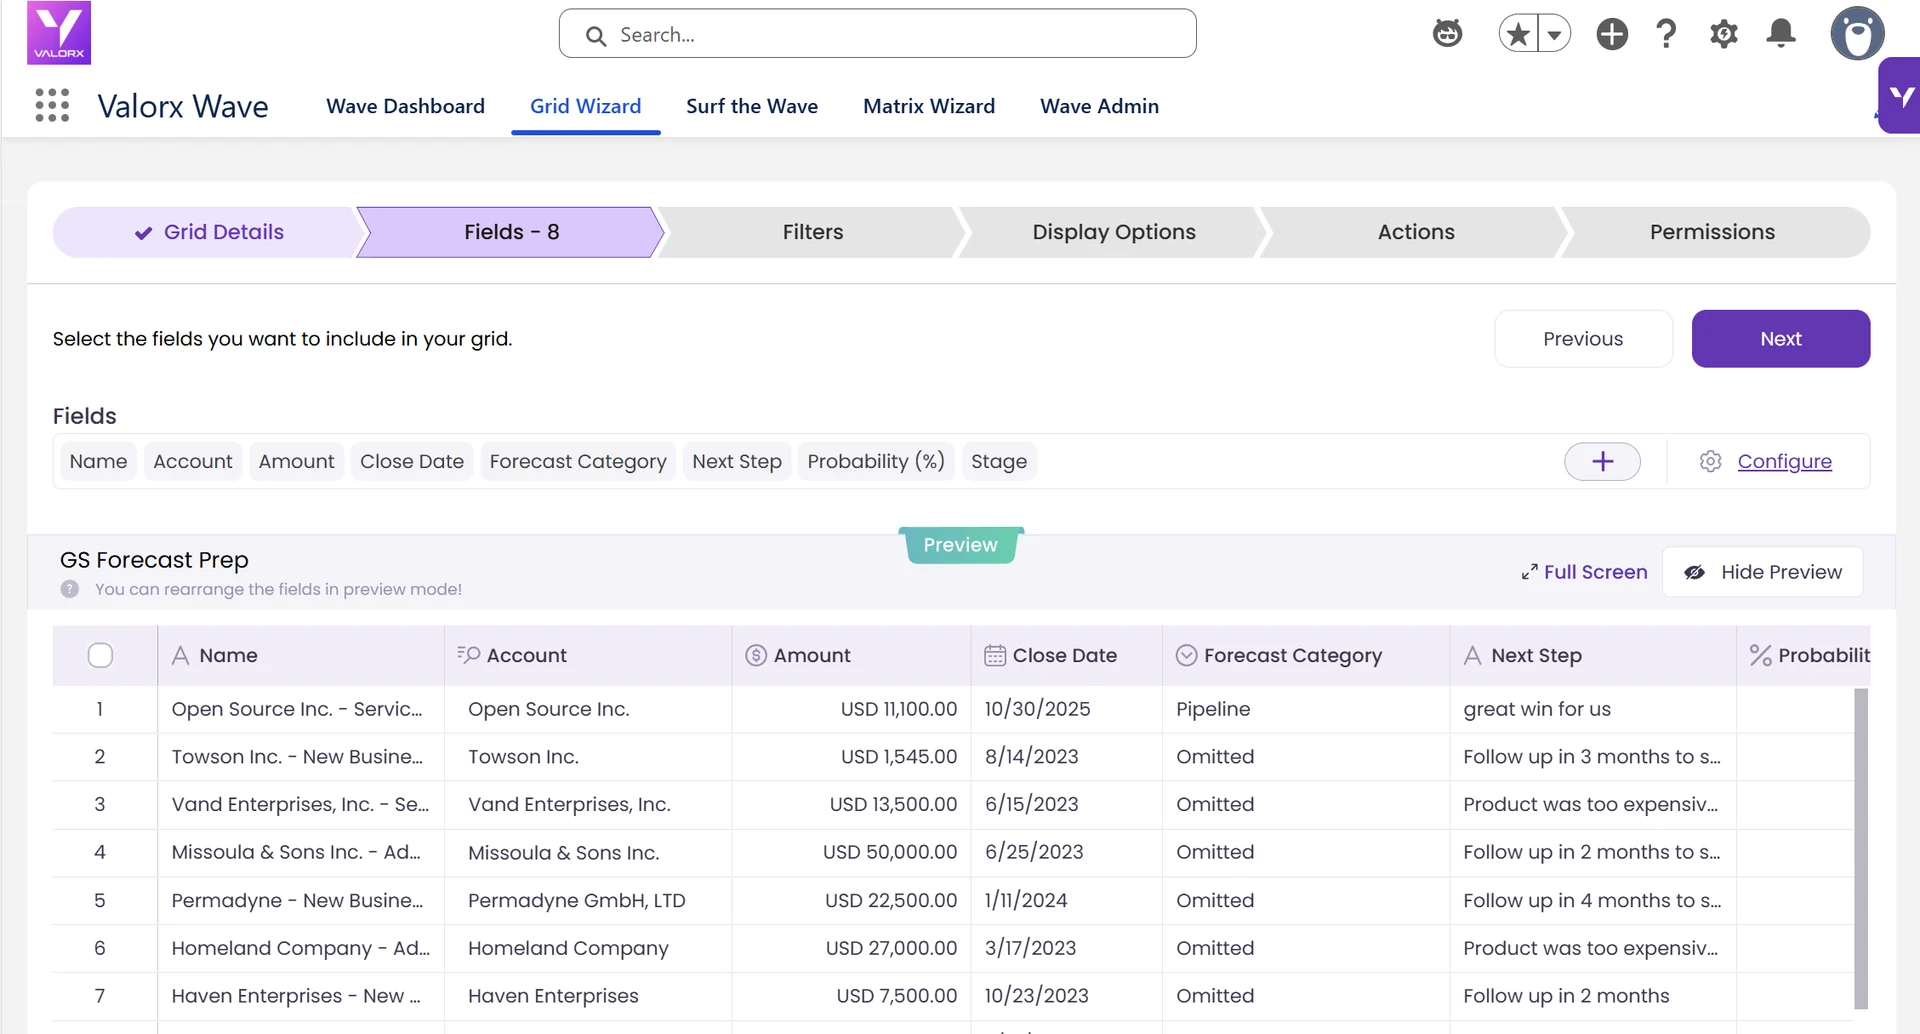
Tip: Drag columns in the preview to match the order you scan in. Placing Stage next to Forecast Category makes mismatches easy to spot.
Step 3: Filter to your open deals
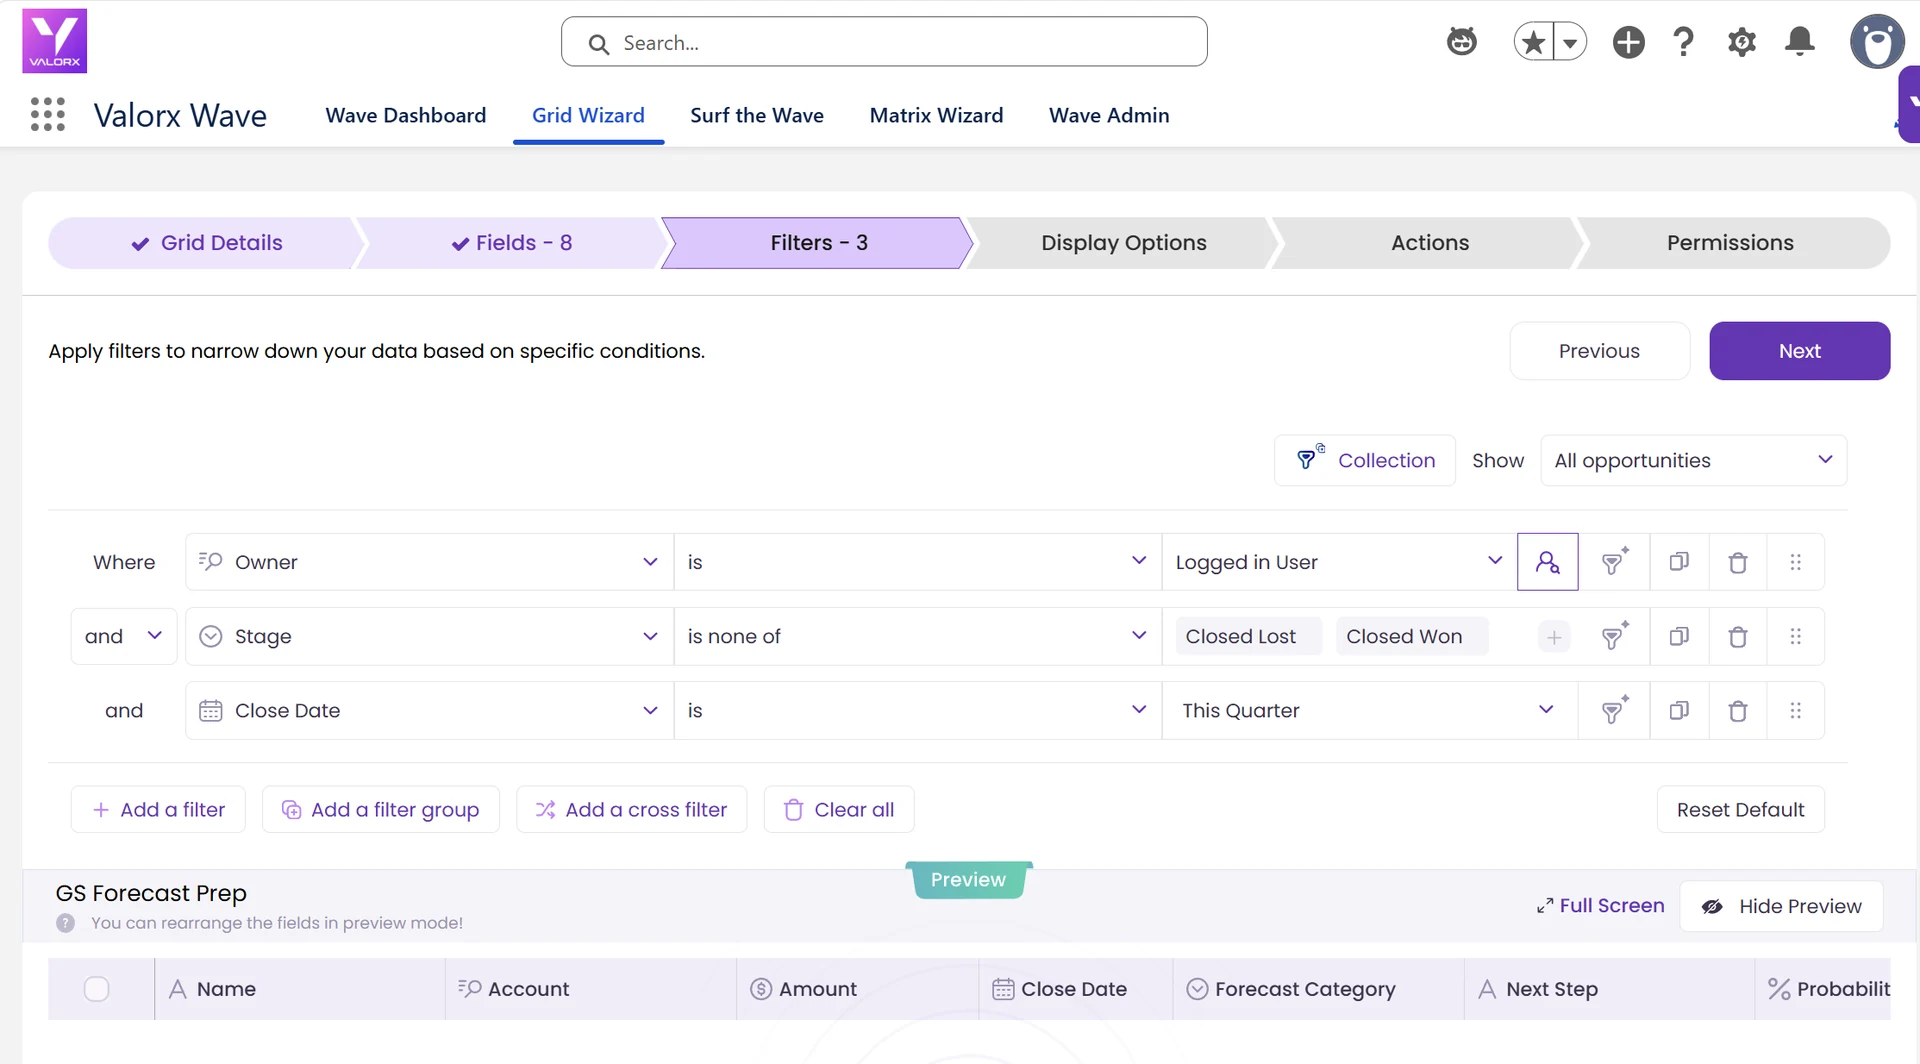
Add three filters so the grid shows only the deals that belong in your forecast:
- Owner is Logged in User, so everyone who opens the grid sees only their own deals
- Stage is none of Closed Lost, Closed Won, to focus on open pipeline
- Close Date is This Quarter, or this quarter and next for a forward-looking view
Click Next.
Filters keep your grid clean. Without them, you’d see every Opportunity in the org. With them, you see exactly the deals you need to review for your forecast.
Tip: Because the Owner filter uses Logged in User, one grid works for the whole team. Share it as a Global Grid and every rep sees their own deals. Managers can make a copy without the Owner filter to review the team forecast in the same live data.
Step 4: Sort by Close Date and flag what needs attention
Click Save, then open the grid in Surf the Wave. Sort by Close Date, earliest first, so the deals closing soonest are at the top.
Then add three Rules so problems stand out without reading every row:
| Rule | Condition | What to do |
|---|---|---|
| Past Due | CloseDate is before Today | Push the date forward, or close the deal out |
| Missing Next Steps | NextStep is blank | Add the next action |
| Wrong Forecast Category | StageName is Negotiation and ForecastCategoryName is Pipeline | Move the deal to Best Case or Commit |
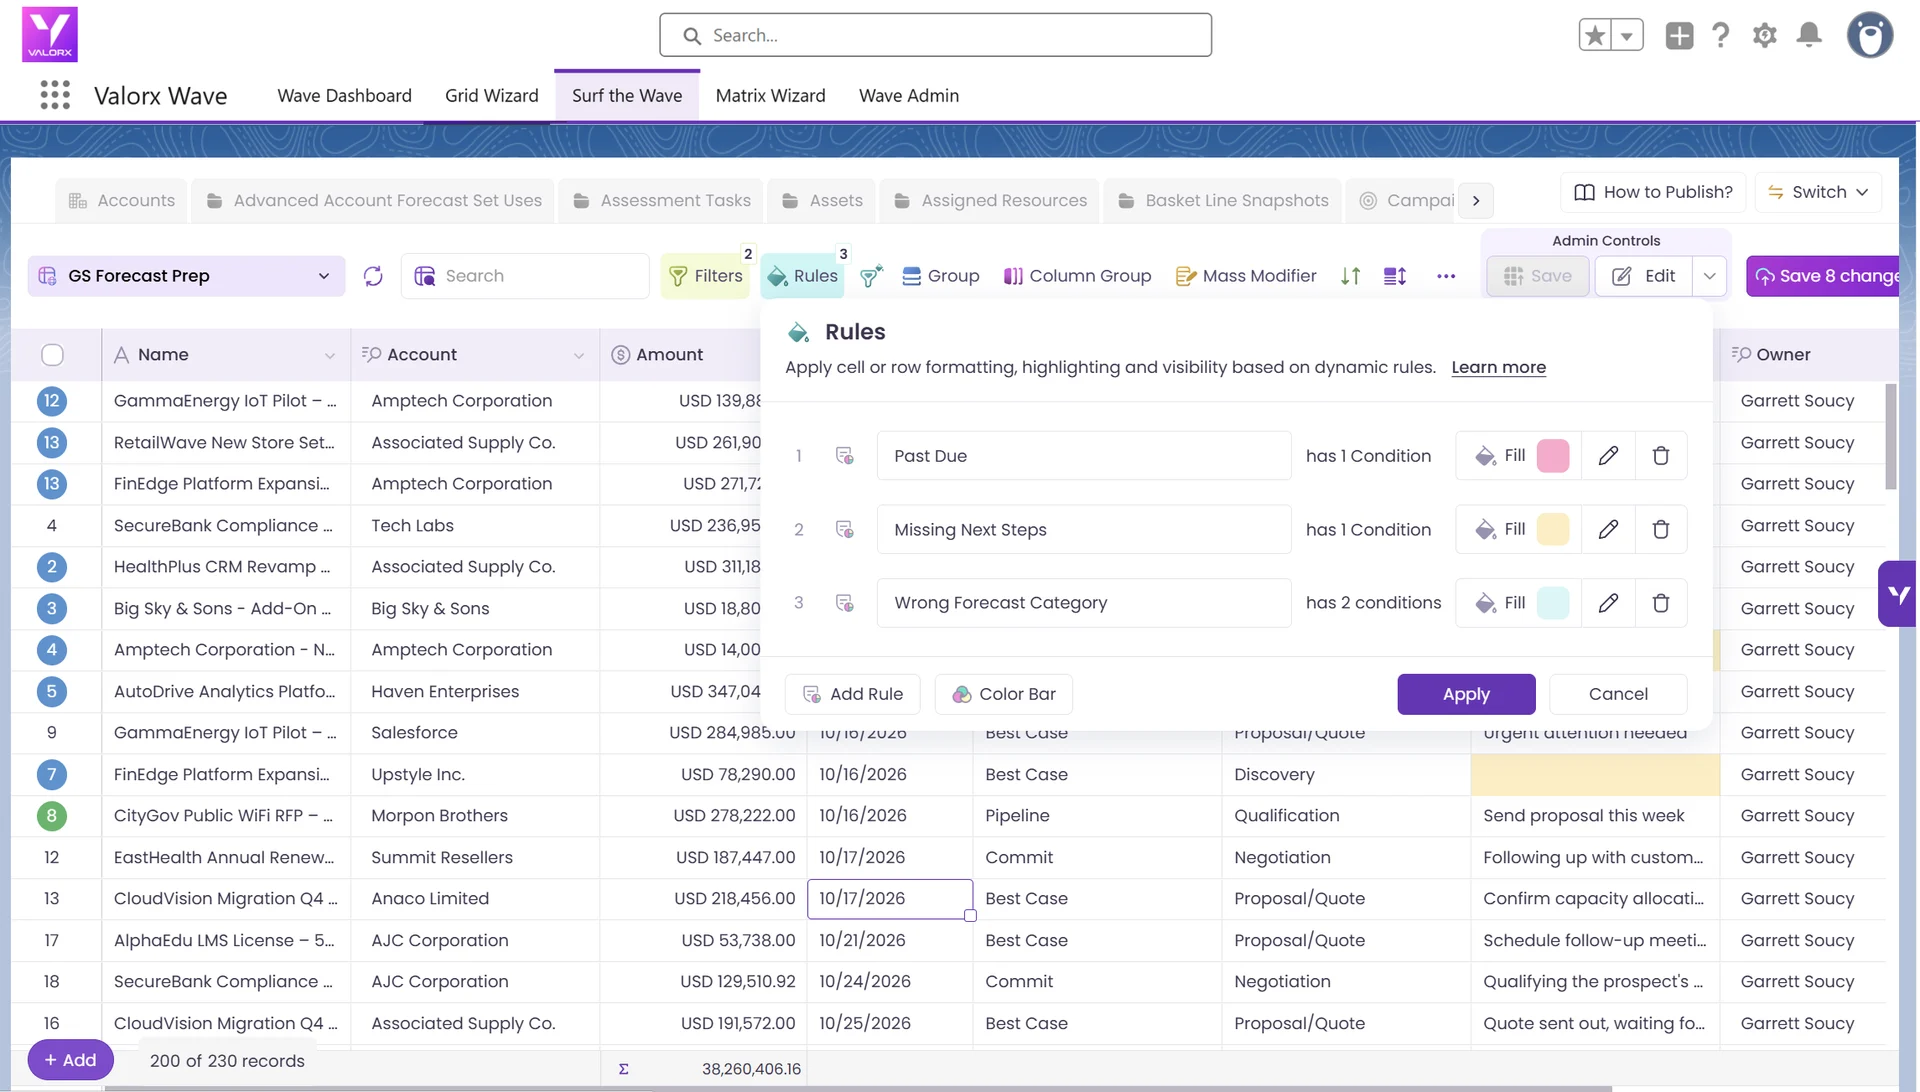
While you scan, also look for stale Stages. A deal that hasn’t moved in weeks probably needs an update.
Tip: For a deeper rules setup, including stale-activity highlighting, see How to clean up your Salesforce pipeline.
Step 5: Update your deals inline or in bulk
This is where Wave saves you time. Edit fields directly in the grid instead of opening each record:
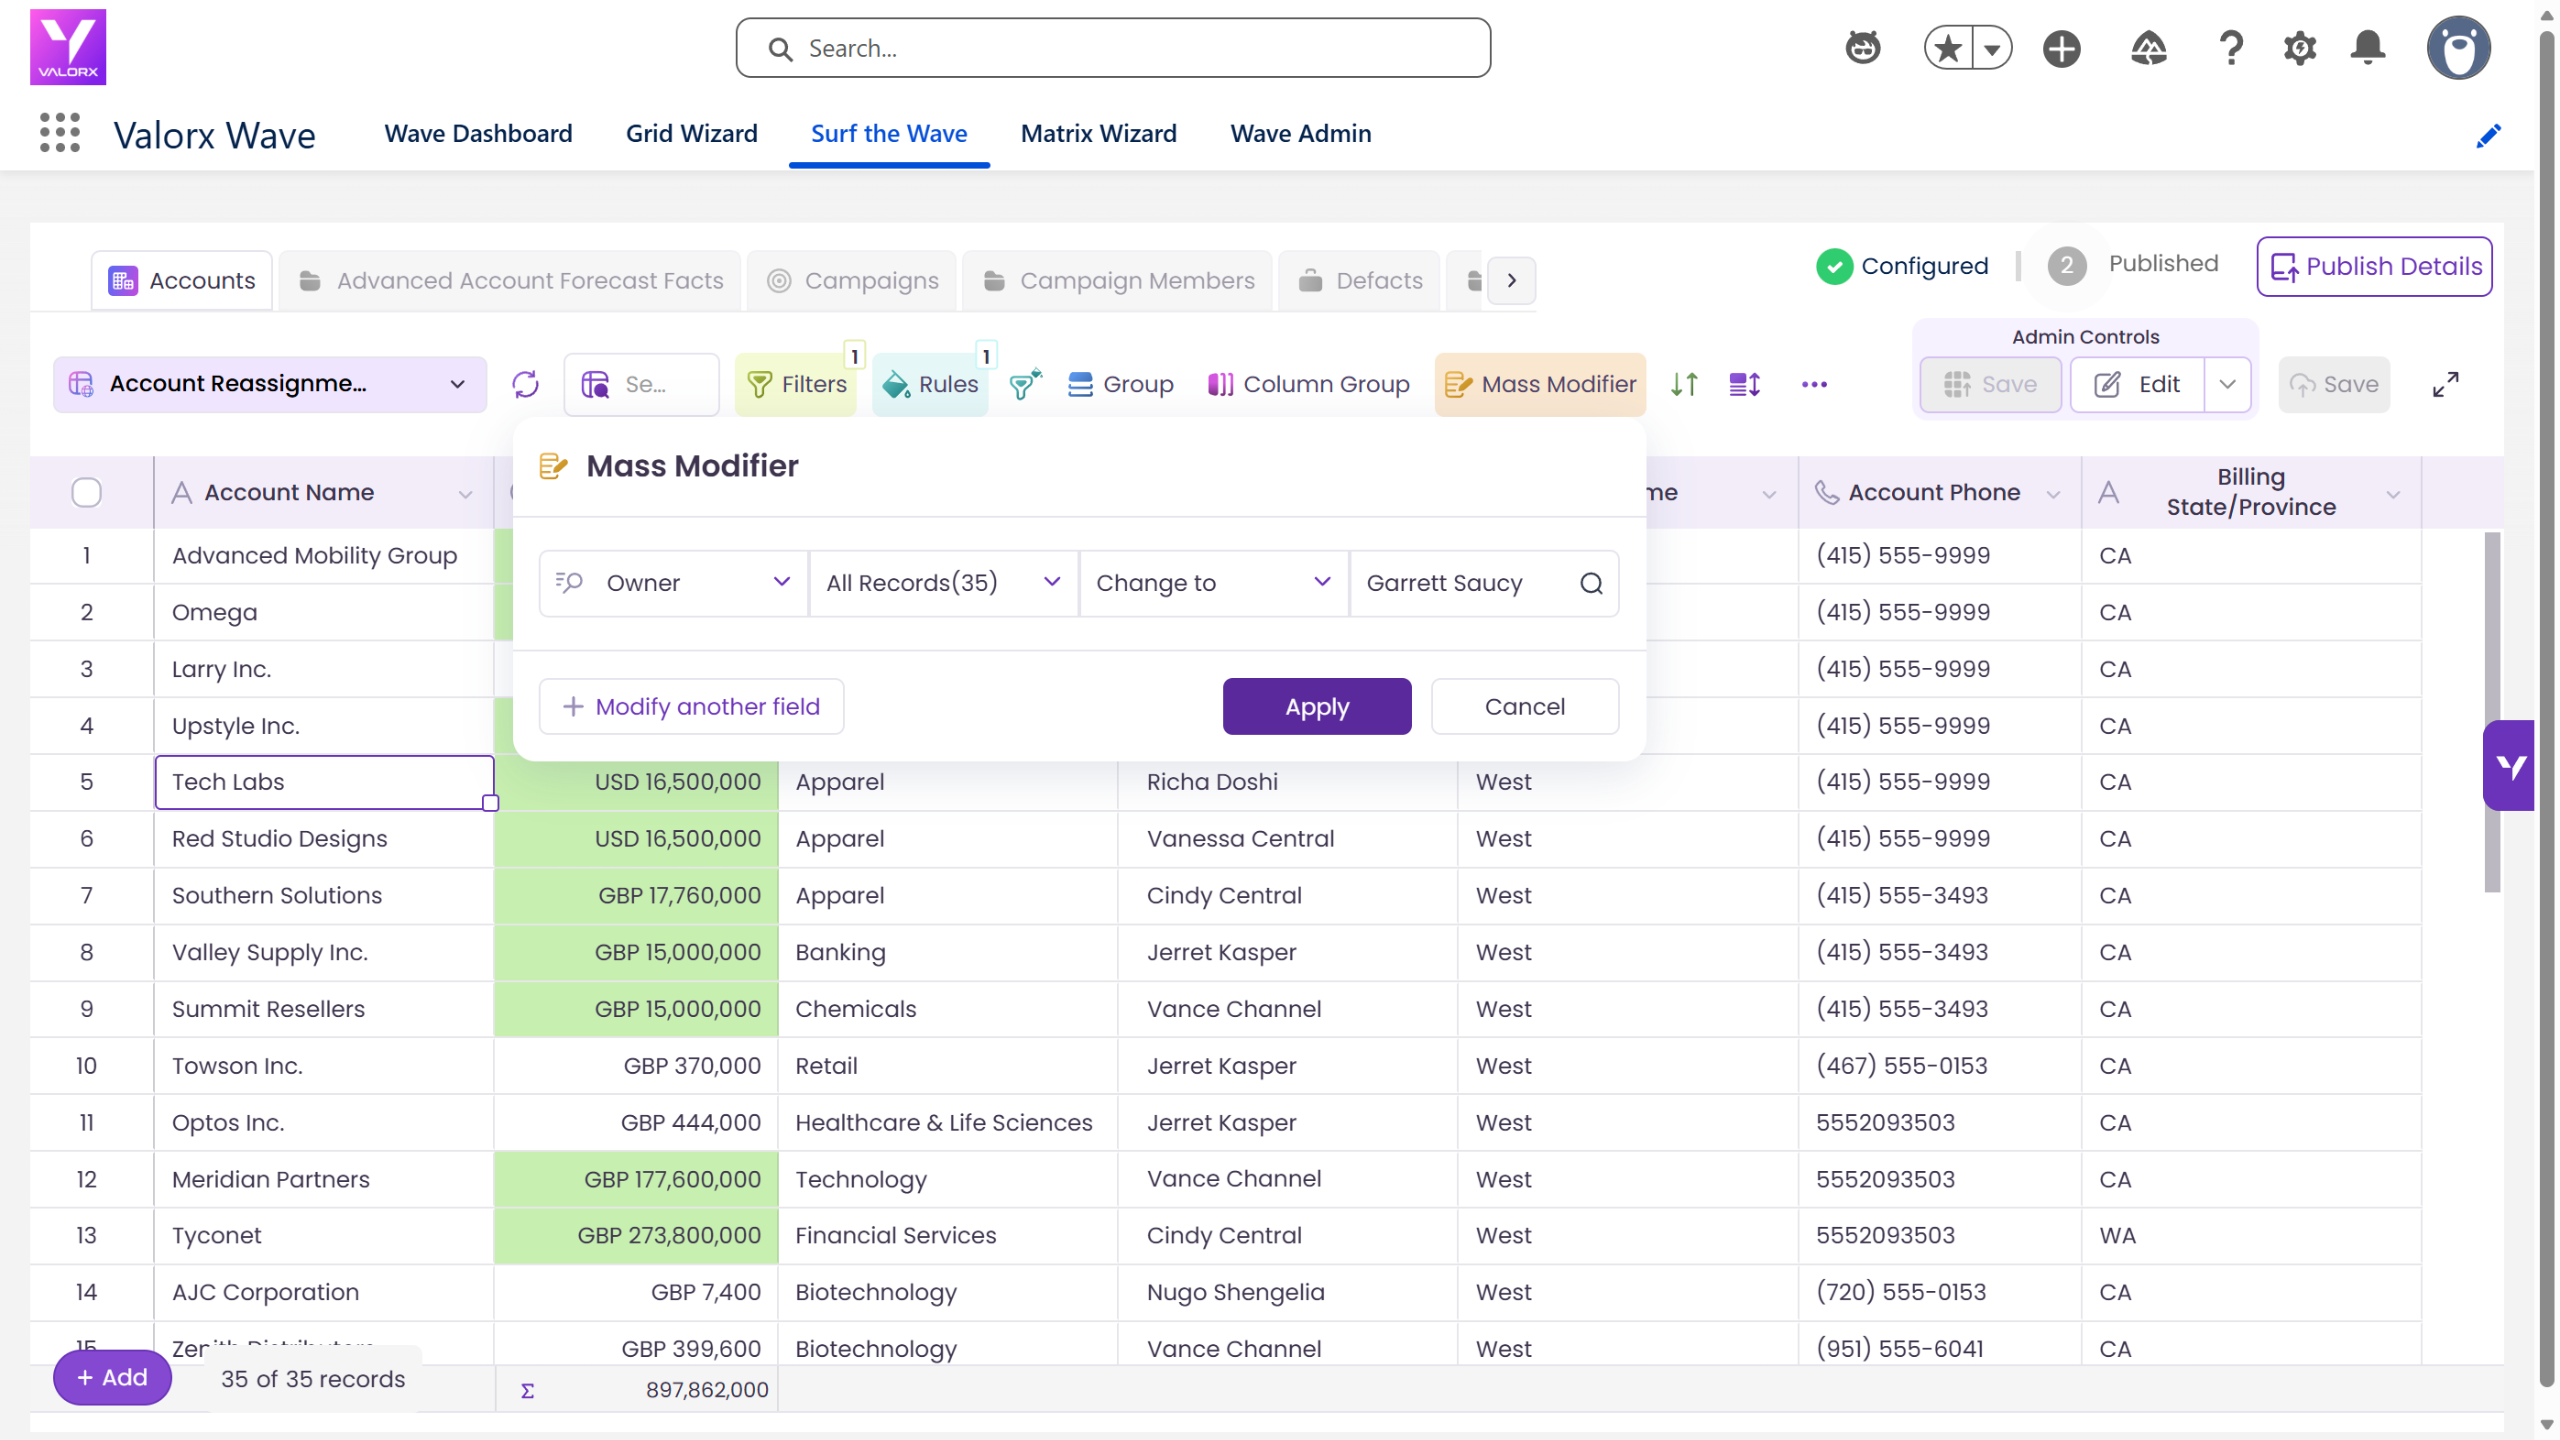
- Move deals to Commit in bulk. Select your late-stage deals, click Mass Modifier, choose Forecast Category, set Change to Commit and click Apply. Do this for every deal you’re confident will close this period.
- Update Close Dates. Click any Close Date cell to push a slipped deal out or pull one in. Update it now rather than explaining a miss later.
- Adjust Amounts. If pricing changed during negotiation, edit the Amount directly. The new number saves back to the Opportunity record.
- Add Next Steps. Type the next action, such as “Send revised proposal by Friday” or “Confirm budget with CFO”.
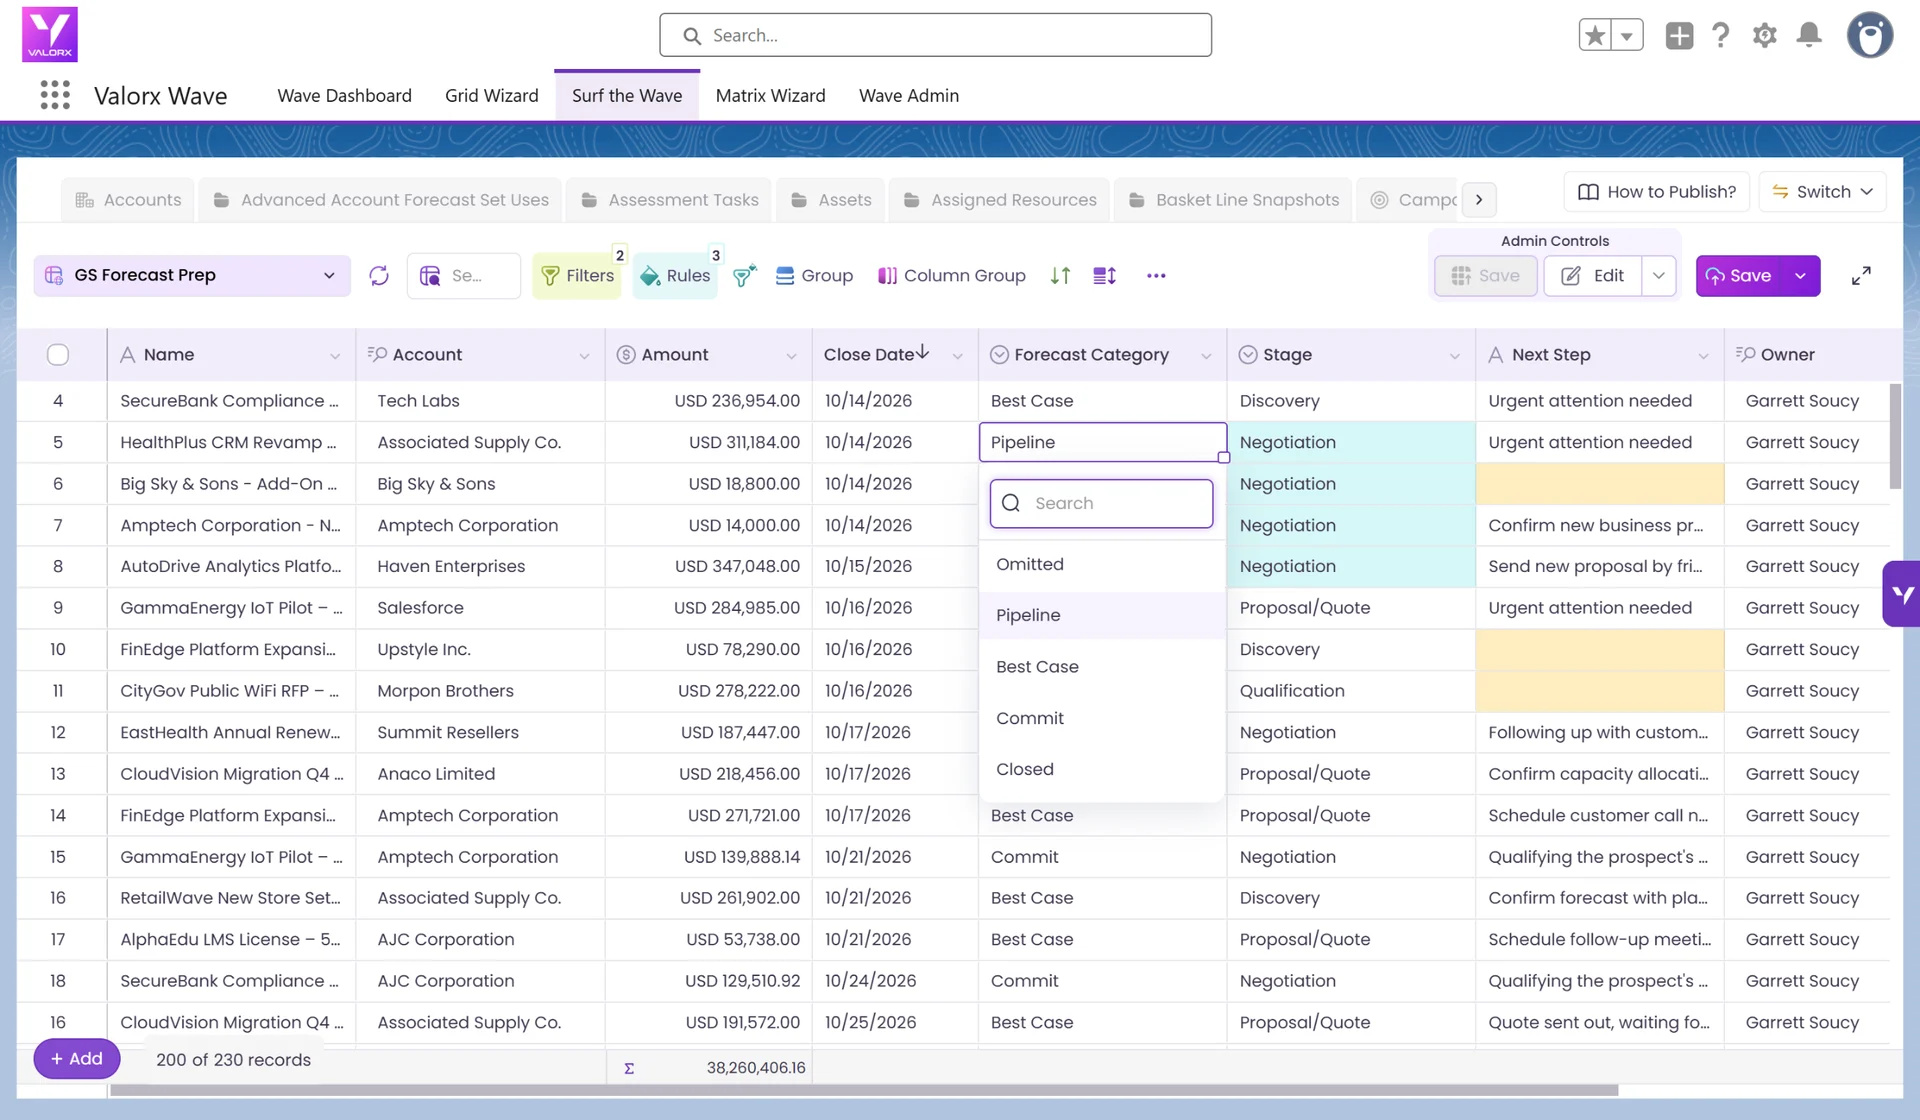
Tip: Edit as many deals as you need before saving. Wave tracks every change and saves them to Salesforce together.
Step 6: Review your changes and save
Open Preview Changes to see every edit before it reaches Salesforce: the record, the field, the original value and the new value. Revert any change you didn’t mean to make, or use Revert All to start over.
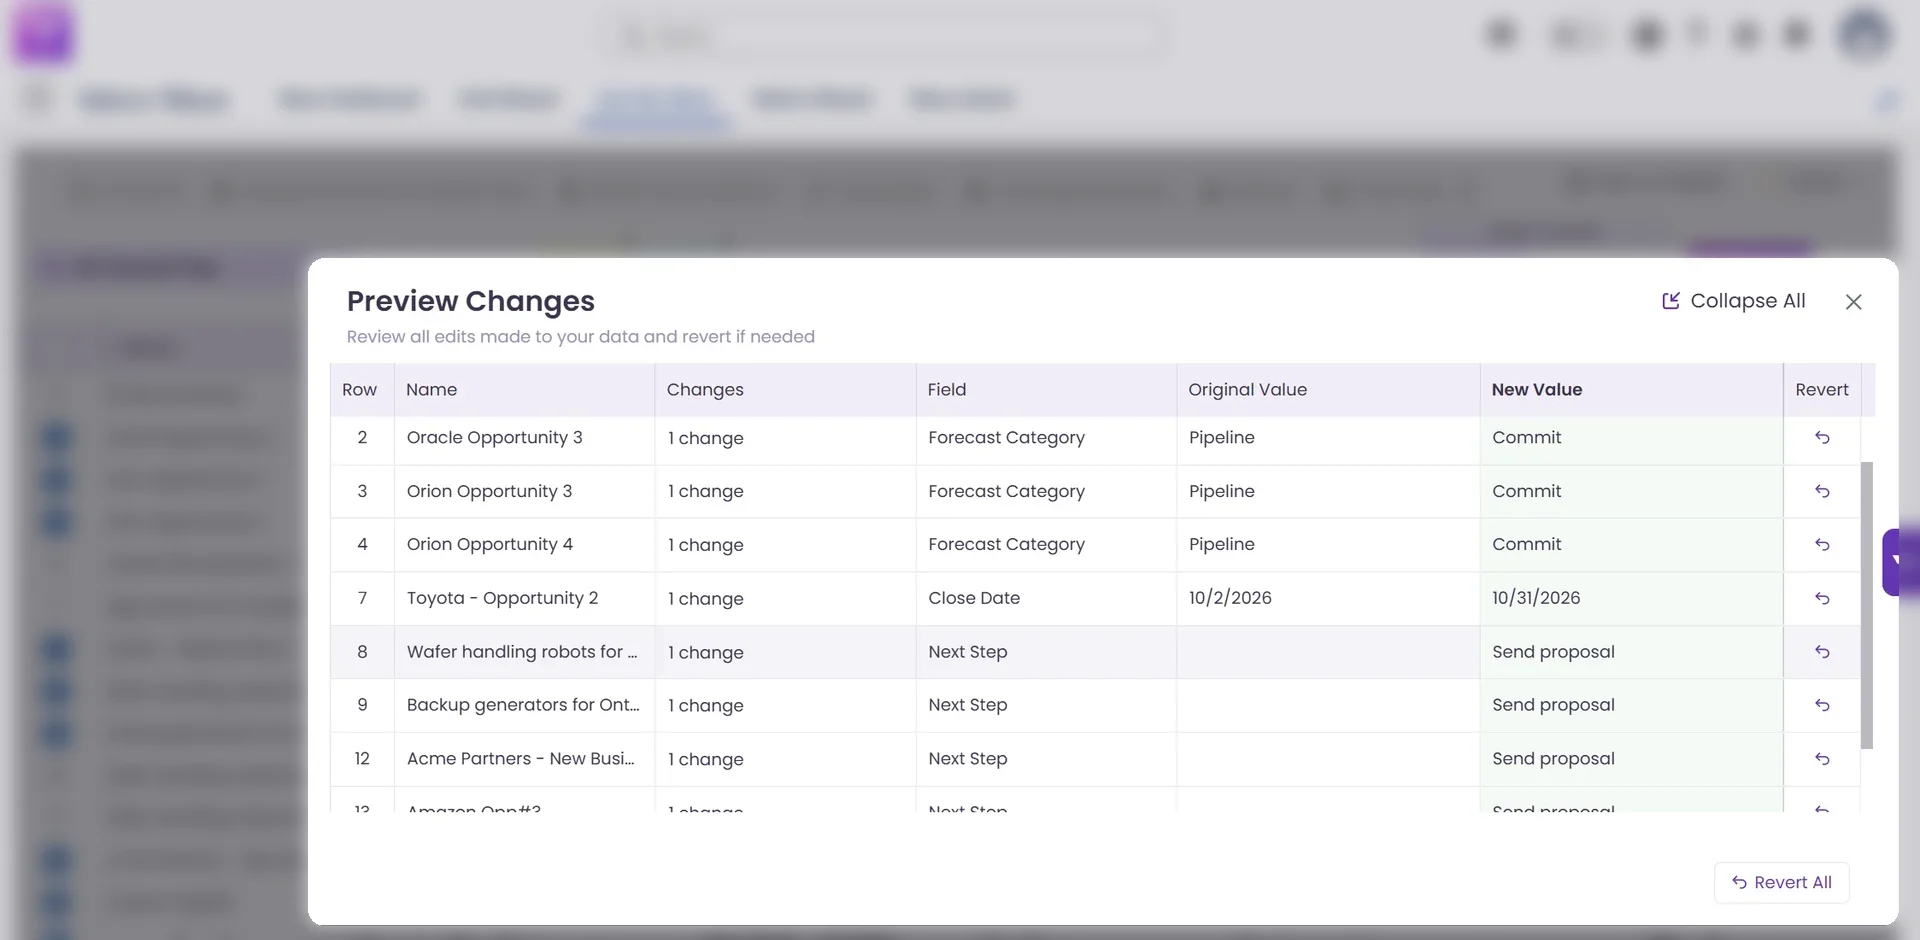
Then click Save to write every change back to Salesforce in one batch. Every update (Stage changes, new Close Dates, adjusted Amounts, Forecast Category moves) saves directly to the Opportunity records. When your manager opens the forecast report or dashboard, they see the numbers you just updated, with no lag and no reconciliation.
Before the call, do a final scan:
- Every deal has a current Close Date, with nothing past due
- Forecast Categories match your confidence: Commit means you’d bet on it
- Amounts reflect the latest pricing
- Every deal has a Next Step, so you can explain the path to close
Tip: Your filters, columns and rules are saved with the grid. Next week, open it and the data refreshes from Salesforce.
Forecast category quick reference
Not sure which category a deal belongs in? Use this as a starting point, and follow your team’s definitions where they differ.
| Forecast category | What it means | When to use it |
|---|---|---|
| Pipeline | Early-stage deal, not yet qualified for the forecast | Discovery and Qualification stages |
| Best Case | Could close this period, but not certain | Proposal sent, positive signals, no verbal commit yet |
| Commit | You’re confident this deal closes this period | Verbal agreement, negotiating final terms |
| Closed | Deal is won and booked | Contract signed, Closed Won stage |
| Omitted | Excluded from the forecast | Lost, disqualified, or pushed to a later period |
Forecast prep, before & after
What used to take 30+ minutes of clicking now takes under 10 in one grid.
| Without Wave | With Valorx Wave |
|---|---|
| Open each Opportunity record one by one to check Stage and Amount | See all your deals in one grid, then sort, scan and spot problems instantly |
| Switch between reports, list views and Kanban to piece together your forecast | One view with every field you need, edited inline and saved to Salesforce |
| Update Forecast Category on each record before the call | Move deals from Pipeline to Commit in bulk with Mass Modifier |
| Stale Close Dates slip through because you didn’t open every deal | Rules highlight past-due dates so you fix them inline |
| 30+ minutes of forecast call prep | Done in under 10 minutes |
Weekly forecast prep checklist
Run through this before every forecast call. Tick items off as you go; your progress stays on this device.
Frequently asked questions
How long does forecast prep take with Valorx Wave?
Building the grid takes about 10 minutes. After that, weekly prep takes 5 to 10 minutes because your filters, columns and rules are saved. Compare that to 30+ minutes of opening records one at a time.
How do I change Forecast Category on multiple opportunities at once?
Select the deals in your Wave grid, click Mass Modifier, choose Forecast Category and set the new value. Click Apply, check your edits in Preview Changes, then click Save to write them all to Salesforce together.
What’s the difference between Stage and Forecast Category in Salesforce?
Stage tracks where a deal is in your sales process. Forecast Category tracks how the deal counts in your forecast. Each Stage maps to a default Forecast Category, and many orgs let reps adjust it when their confidence differs from the stage.
Will my manager see my updates right away?
Yes. Wave saves directly to the Opportunity records in Salesforce, so forecast reports and dashboards show your new values as soon as you save.
Does every rep need to build their own grid?
No. Build the grid once with the Owner filter set to Logged in User and share it as a Global Grid. Each rep who opens it sees only their own deals.
Does Valorx Wave respect Salesforce permissions and validation rules?
Yes. Wave runs natively inside Salesforce and honors your existing field-level security, sharing rules and validation rules. Users only see and edit records they already have access to.
Related guides
- How to clean up your Salesforce pipeline in 15 minutes: find and fix stale deals before forecast day
- How to build your first grid with Valorx Wave: the Grid Wizard basics
- How to publish an App in Valorx Wave: put this grid on a Lightning page
Walk into your next forecast call ready
Install Valorx Wave, build your forecast prep grid in 10 minutes, and update every deal from one view.
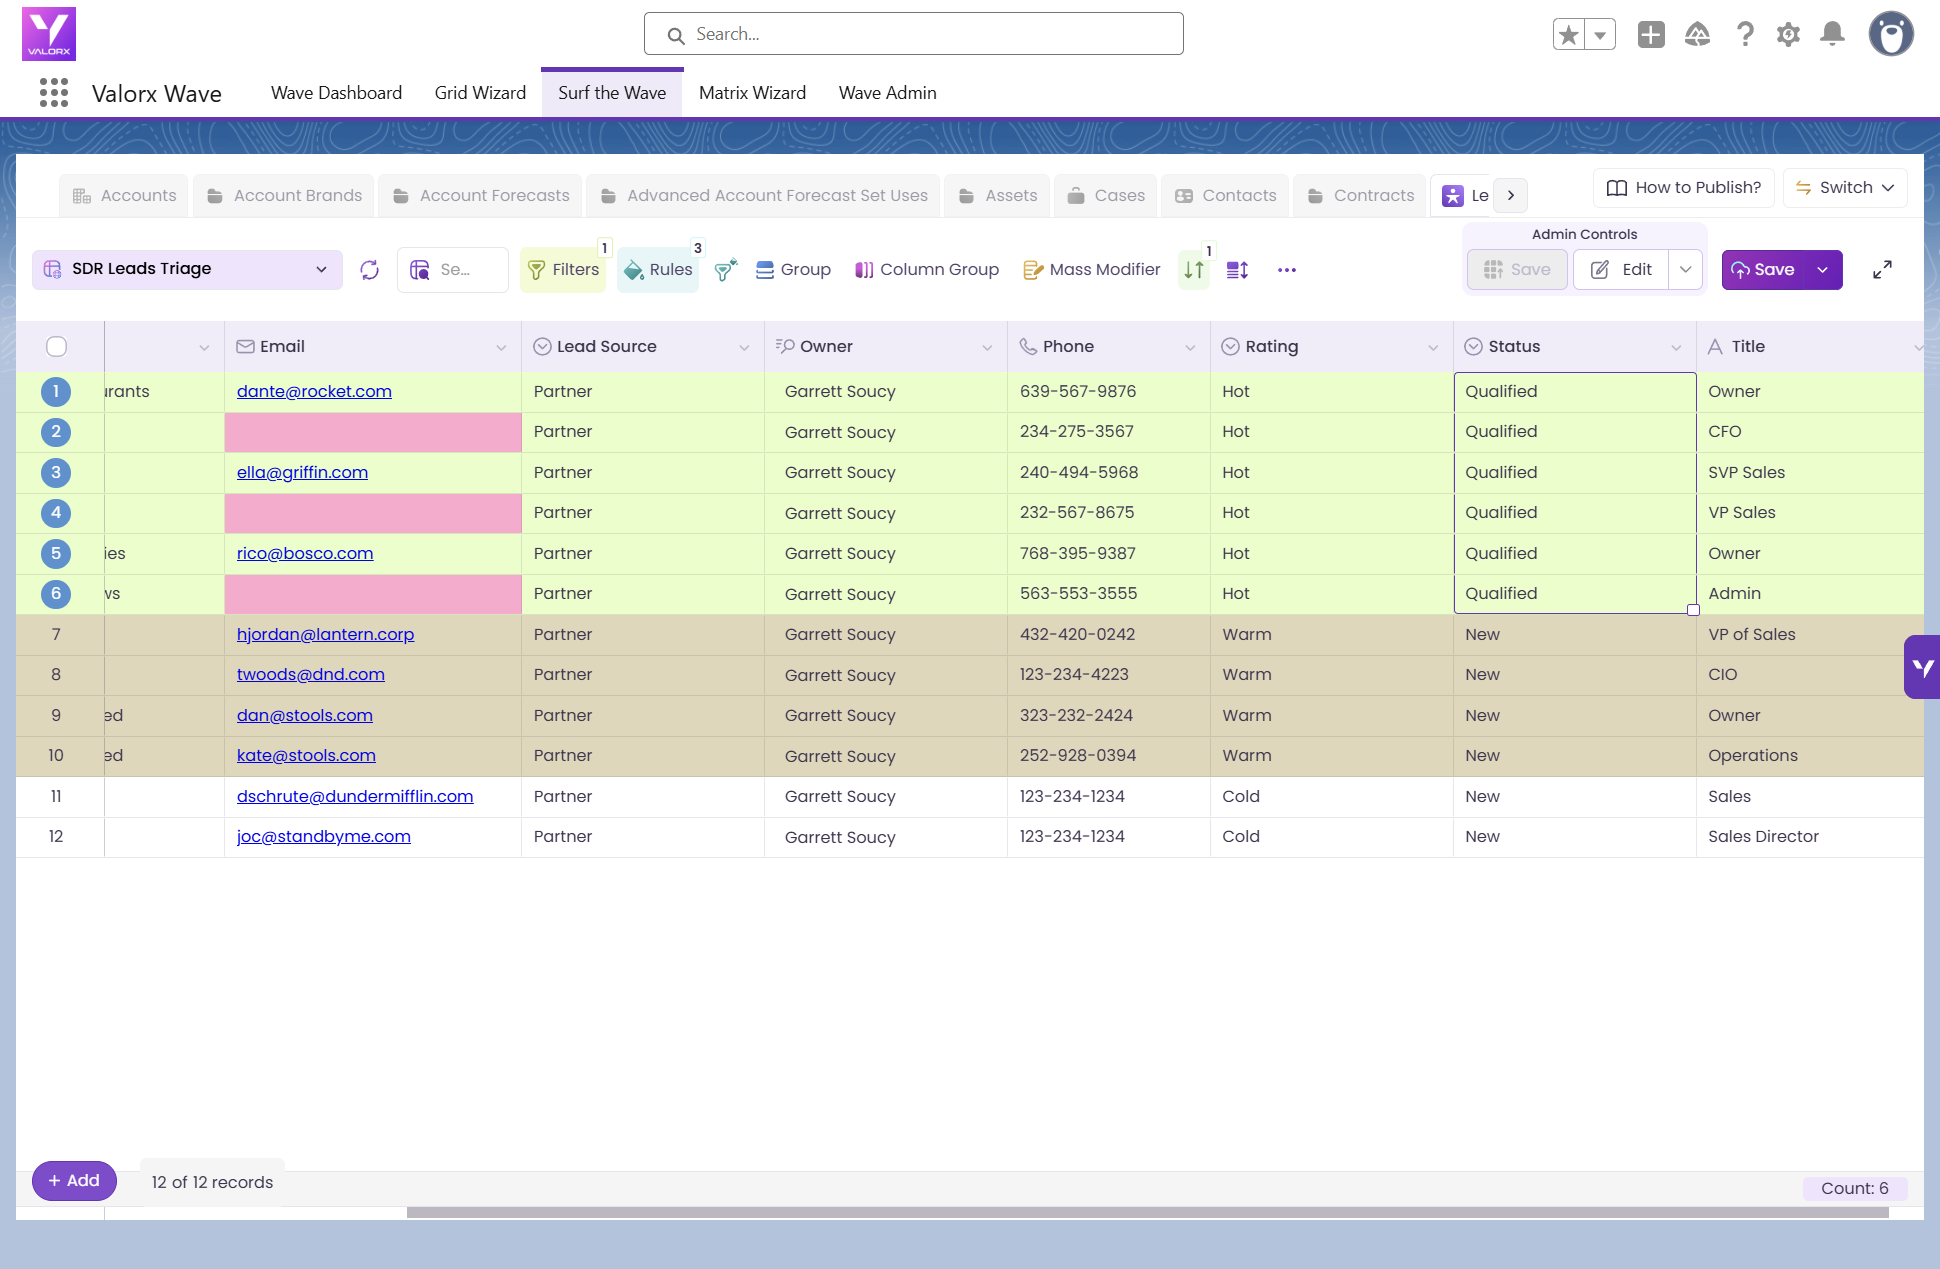

Choose the workflow you need:
Try Wave in browser Extension

Try Wave in Salesforce

Try Fusion In Excel

Enhancing Salesforce for industry leaders